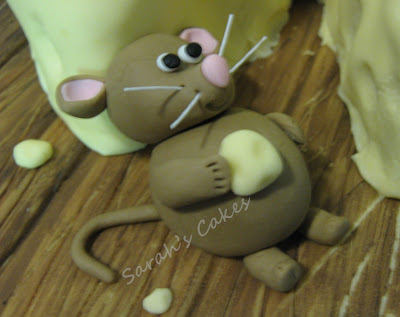
So back in June I made a cake for a Cheese Lover. You can't really call it a 'Cheese Lover's Dream' as it's more like 'A Cheese Lover's Nightmare' to find their cheese full of mice!
It was actually a lot of fun to make once the sugarpaste was on (it was a little tricky to cover the cut out bit in the middle of the cake without tearing it). I cut out a small triangle from the main cake then covered this and placed on top like a slice of cheese.
I haven't made mice before but they are surprisingly easy to make. Here is what you'll need;
1 Large egg shape piece of modelling paste - body
1 Small egg shape - head
4 sausage shapes - arms and legs (shape them to give hands & feet and mark lines with a craft knife)
2 teardrop shapes - ears (flatten then cup slightly with a ball tool)
2 pink small teardrop shapes - inner ear (flatten then cup slightly with a ball tool)
1 long sausage - tail
Then you just need to stick them all together with edible glue, add a small teardrop for the nose and small circles for eyes.
I used sugar flower stamens for the whiskers, I cut them in half then snipped off the heads and pushed them into the snout with a little sugar glue on the ends.

The mouse poking out of a hole was easier to make as you only need to make the top of his body. You do need to cut a small hole in the cake before you cover it with sugarpaste so he will sit in it.
I wasn't sure how to make the holes so it would look like Swiss Cheese, I had cut a few holes in the sponge before covering it.
Then I tried to make the holes stand out more by smoothing over them with a ball tool, which looked good but it still needed more. So I started pressing the ball tool into the sugarpaste in different places and made different sized holes. Soon enough it started to look like real cheese, and if I'm honest yes, I did get carried away with the holes! But it was so fun because it surprised me how real it looked.
To make the wood effect board, I covered the board with cream coloured sugarpaste then marked shallow lines about two inches apart to make it look like pieces of wood stuck together.
Then I painted it with light brown paste colour watered down with clear alcohol (Clear alcohol evaporates completely so is safe to use with sugar craft paste and dust colours - even for children's cakes) don't use water as this will dissolve the sugarpaste and you will have a sticky mess.
Once it has dried paint over in patches with a darker brown paste colour diluted with clear alcohol. Allow to dry then using a scribing tool, mark lines for the grain of the wood, the cream colour shows through to give a nice wood effect.


No comments:
Post a Comment
Your feedback is always welcome, feel free to leave a comment or ask a question.