Friday 2 August 2013

A Cheese Cake (Does not contain real cheese!)

Since starting a new job at a local Cake makers and decorating supplies shop in Liskeard, I haven't had much time to update the blog very often. But thanks to all who continue to check in, I will try to update the blog as soon and often as I can.
So back in June I made a cake for a Cheese Lover. You can't really call it a 'Cheese Lover's Dream' as it's more like 'A Cheese Lover's Nightmare' to find their cheese full of mice!

It was actually a lot of fun to make once the sugarpaste was on (it was a little tricky to cover the cut out bit in the middle of the cake without tearing it). I cut out a small triangle from the main cake then covered this and placed on top like a slice of cheese.


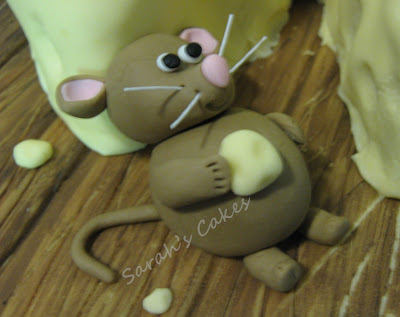
I haven't made mice before but they are surprisingly easy to make. Here is what you'll need;
1 Large egg shape piece of modelling paste - body
1 Small egg shape - head
4 sausage shapes - arms and legs (shape them to give hands & feet and mark lines with a craft knife)
2 teardrop shapes - ears (flatten then cup slightly with a ball tool)
2 pink small teardrop shapes - inner ear (flatten then cup slightly with a ball tool)
1 long sausage - tail
Then you just need to stick them all together with edible glue, add a small teardrop for the nose and small circles for eyes.

I used sugar flower stamens for the whiskers, I cut them in half then snipped off the heads and pushed them into the snout with a little sugar glue on the ends.
 

 The mouse poking out of a hole was easier to make as you only need to make the top of his body. You do need to cut a small hole in the cake before you cover it with sugarpaste so he will sit in it.


I wasn't sure how to make the holes so it would look like Swiss Cheese, I had cut a few holes in the sponge before covering it.
Then I tried to make the holes stand out more by smoothing over them with a ball tool, which looked good but it still needed more. So I started pressing the ball tool into the sugarpaste in different places and made different sized holes. Soon enough it started to look like real cheese, and if I'm honest yes, I did get carried away with the holes! But it was so fun because it surprised me how real it looked.

To make the wood effect board, I covered the board with cream coloured sugarpaste then marked shallow lines about two inches apart to make it look like pieces of wood stuck together.
Then I painted it with light brown paste colour watered down with clear alcohol (Clear alcohol evaporates completely so is safe to use with sugar craft paste and dust colours - even for children's cakes) don't use water as this will dissolve the sugarpaste and you will have a sticky mess.
Once it has dried paint over in patches with a darker brown paste colour diluted with clear alcohol. Allow to dry then using a scribing tool, mark lines for the grain of the wood, the cream colour shows through to give a nice wood effect.

Saturday 27 July 2013

Breakfast at Tiffany's Birthday cake


Here is a Breakfast at Tiffany's birthday cake I made recently.  (Click pictures to enlarge)

I made edible pearls from sugarpaste and draped them around, then made plaques from flower paste and wrote quotes from the movie on them.
I used a mould to make the pearls but you could make them by rolling small balls of paste by hand.

I coloured the top tier sugarpaste with Ice blue paste colour by Sugarflair. Just adding in a little with a cocktail stick until I got the desired colour.


I finished off the plaques with edible jelly gems, and also placed some around the cake.

I made the ring that came from the Cracker Jack box which Paul Varjak gets engraved and gives to Holly Golightly.

 I imprinted the design of the Cracker Jack box using a scriber tool then coloured over the lines using edible colour pens.

Saturday 11 May 2013

1st Birthday Cake x 3


A while ago I had the pleasure of designing three similar birthday cakes for a special little one year old, who was having three parties!

Her parents wanted each cake to be in the shape of the number one, and all of them to be pink.
I kept the same blossom theme for each one but changed the details.
This was the first cake I made with pretty blossoms and building blocks shaped from sugarpaste to spell out 'one today'.


This cake was for the second party, this time I made a rag doll and teddy bear from modelling paste.


There was going to be a ball pool at this party so I made it the feature for this cake. I rolled out two long sausage shapes and joined the ends to form rings for the ball pool, then filled it with rolled balls of modelling paste and a little head poking up through.


Each cake was carved in to the shape of a number one, and filled with a thin layer of buttercream before being covered with sugarpaste.

A is for Apple...
 
 
B is for Bear...
 

 And C is for Cake!
This was the third cake, with a similar design but focused on the building blocks spelling out A, B, C.

A teddy dog made from modelling paste.


These cakes were a lot different to what I had made in the past and were a lot of fun to make.
Hope you liked them too!


Purple & Silver Wedding Cake


Back in September I made a Wedding cake for a couple who wanted a purple and silver themed cake.

After deciding on the design they went for a three tiered stacked cake. (They sent me a picture of a cake - so all credit for the original design goes to Cupkates.)
This was a 10", 8" and 6".

They wanted Cadbury's Purple ribbon on the bottom and top tiers, and Silver ribbon on the middle.
The middle tier was coloured purple to complement the purple ribbon, with silver hearts cut from modelling paste.
The bottom and top tiers had stripes of purple sugarpaste and the top tier had little purple hearts on it.
The top was left clear because the groom was sorting out a surprise topper.

I had white sugarpaste (fondant) which I coloured purple myself with Grape Violet Sugarflair paste colour. I just added more colour using a cocktail stick until I got a colour close to the Cadbury's purple.


The bottom and middle tiers were a moist, light fruit cake covered with marzipan and sugarpaste.
The top tier was vanilla sponge filled with jam and vanilla buttercream, covered with sugarpaste.


The silver hearts were cut from modelling paste then painted with a metallic silver dusting powder which is completely edible.

Thursday 25 April 2013

Rose Swirl Cupcakes


Roses aren't just red they can come in any colour you want, just like these cupcakes.

Here are some of the various Rose Swirl Cupcakes I have made recently.

All of the swirls are made from piping Buttercream into a simple but effective rose shape.

Click pictures to enlarge. 

Two tone Blue Rose Swirl Cupcakes

Two tone pink Rose Swirls


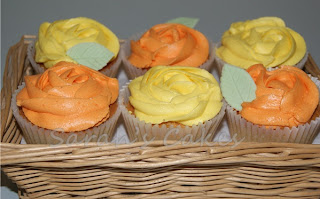
Orange and Yellow rose swirls decorated with edible leaves


Chocolate Ganache Rose Swirls 

These Chocolate Ganache Rose Swirl Cupcakes were decorated with my hand made wraps, they look effective over some of the darker cupcake cases.