Showing posts with label birthday. Show all posts

Friday, 2 August 2013

A Cheese Cake (Does not contain real cheese!)

Since starting a new job at a local Cake makers and decorating supplies shop in Liskeard, I haven't had much time to update the blog very often. But thanks to all who continue to check in, I will try to update the blog as soon and often as I can.
So back in June I made a cake for a Cheese Lover. You can't really call it a 'Cheese Lover's Dream' as it's more like 'A Cheese Lover's Nightmare' to find their cheese full of mice!

It was actually a lot of fun to make once the sugarpaste was on (it was a little tricky to cover the cut out bit in the middle of the cake without tearing it). I cut out a small triangle from the main cake then covered this and placed on top like a slice of cheese.


I haven't made mice before but they are surprisingly easy to make. Here is what you'll need;
1 Large egg shape piece of modelling paste - body
1 Small egg shape - head
4 sausage shapes - arms and legs (shape them to give hands & feet and mark lines with a craft knife)
2 teardrop shapes - ears (flatten then cup slightly with a ball tool)
2 pink small teardrop shapes - inner ear (flatten then cup slightly with a ball tool)
1 long sausage - tail
Then you just need to stick them all together with edible glue, add a small teardrop for the nose and small circles for eyes.

I used sugar flower stamens for the whiskers, I cut them in half then snipped off the heads and pushed them into the snout with a little sugar glue on the ends.
 

 The mouse poking out of a hole was easier to make as you only need to make the top of his body. You do need to cut a small hole in the cake before you cover it with sugarpaste so he will sit in it.


I wasn't sure how to make the holes so it would look like Swiss Cheese, I had cut a few holes in the sponge before covering it.
Then I tried to make the holes stand out more by smoothing over them with a ball tool, which looked good but it still needed more. So I started pressing the ball tool into the sugarpaste in different places and made different sized holes. Soon enough it started to look like real cheese, and if I'm honest yes, I did get carried away with the holes! But it was so fun because it surprised me how real it looked.

To make the wood effect board, I covered the board with cream coloured sugarpaste then marked shallow lines about two inches apart to make it look like pieces of wood stuck together.
Then I painted it with light brown paste colour watered down with clear alcohol (Clear alcohol evaporates completely so is safe to use with sugar craft paste and dust colours - even for children's cakes) don't use water as this will dissolve the sugarpaste and you will have a sticky mess.
Once it has dried paint over in patches with a darker brown paste colour diluted with clear alcohol. Allow to dry then using a scribing tool, mark lines for the grain of the wood, the cream colour shows through to give a nice wood effect.

Saturday, 27 July 2013

Breakfast at Tiffany's Birthday cake


Here is a Breakfast at Tiffany's birthday cake I made recently.  (Click pictures to enlarge)

I made edible pearls from sugarpaste and draped them around, then made plaques from flower paste and wrote quotes from the movie on them.
I used a mould to make the pearls but you could make them by rolling small balls of paste by hand.

I coloured the top tier sugarpaste with Ice blue paste colour by Sugarflair. Just adding in a little with a cocktail stick until I got the desired colour.


I finished off the plaques with edible jelly gems, and also placed some around the cake.

I made the ring that came from the Cracker Jack box which Paul Varjak gets engraved and gives to Holly Golightly.

 I imprinted the design of the Cracker Jack box using a scriber tool then coloured over the lines using edible colour pens.

Thursday, 25 April 2013

Rose Swirl Cupcakes


Roses aren't just red they can come in any colour you want, just like these cupcakes.

Here are some of the various Rose Swirl Cupcakes I have made recently.

All of the swirls are made from piping Buttercream into a simple but effective rose shape.

Click pictures to enlarge. 

Two tone Blue Rose Swirl Cupcakes

Two tone pink Rose Swirls


Orange and Yellow rose swirls decorated with edible leaves


Chocolate Ganache Rose Swirls 

These Chocolate Ganache Rose Swirl Cupcakes were decorated with my hand made wraps, they look effective over some of the darker cupcake cases.


Tuesday, 9 April 2013

Pretty in Pink


I've been busy coming up with some new designs available to order and will upload them as soon as I can.

Here are some cupcakes I created for a pink theme, which can be ordered in any colour scheme.

There are three different designs that compliment each other nicely. They feature soft shimmery sugar pearls which give them a lovely classy vintage effect, making them perfect for any event whether it be birthdays, weddings, engagements or mother's day.
The pearls are soft so no teeth will be broken unlike the old silver balls you used to get that were more like jaw breakers!

Each cupcake is topped with a thin layer of butter cream then covered with a disc of fondant before being decorated.

Click pictures to enlarge.

 
Each sugar pearl was painstakingly stuck on with edible glue one by one! But the end  result is worth it. The cupcake above is finished with an edible sugar rose and leaf dusted with a shimmery lustre.


This cake was topped with sugar blossoms and decorated round the edge with sparkly pink sugar crystals which gives the fondant a nice crunch.


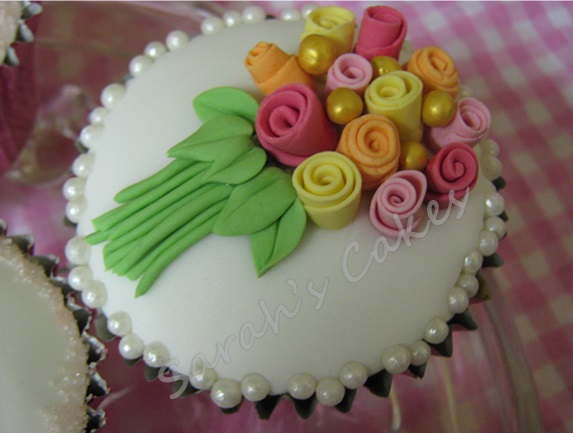
 A bouquet of edible roses inspired by the book Bake me I'm yours cupcake love.